
And other badusb mitigation with udev rules and Group Policy
I recently had the pleasure and good fortune to work with a small group of my peers in exploring the HAK5 USB Rubber Ducky as a part of the RITSEC mentorship group. We all approached the project from different angles, and as a result we learned a lot about how to perform attacks, different attacks that were possible, and some possible mitigations. Please check out Olivia Gallucci’s blog (January 29, 2021: RITSEC Hak5 Rubber Ducky Research Presentation) if you would like to see what the group worked on as a whole.
This post if going to focus mainly on my own research as part of the team and what I discovered in regard to blocking the USB Rubber Ducky. The method can easily be expanded to mitigate against other badusb devices as well. I will start by talking about the USB protocol itself and how that lead me to the methods I came up with. If you would like to skip the background information, scroll down a bit to find the actual blocking methods.
The USB Protocol
The USB protocol is essentially the agreed upon language that USB devices and hosts use to communicate and set up a connection. This is what allows for new devices to be connected and accurately recognized for what they are. At a high level, when a device is plugged in to a host the host will see that there is something now connected and query the new device for its USB descriptors. Now there are a lot of USB descriptors defined within the protocol, but we do not need to go into all of them to get a general understanding of what takes place and how the USB Rubber ducky abuses the process.
There are three main descriptors that we will want to become familiar with: idProduct, idVendor, and bInterfaceClass. As you might expect, the idProduct and idVendor descriptors are used to identify the manufacturer and specific device that has been connected. This is not used by the host beyond labeling purposes in most cases. bInterfaceClass is used to identify what type of device was just plugged in. There are many, and a complete list can be found on the official USB Implementors Forum website, but for now we are concerned with only two: 0x08 which defines a device as USB mass storage, and 0x03 which defines a device as a Human Interface Device (HID).
Usually when a USB device is plugged in, it will correctly identify itself as what it really is. If it does not do so, the device will not work as intended. For example, if a USB storage device sends a bInterfaceClass descriptor which identifies itself as a printer, it will not show up as a USB drive that users can save files to. Because most manufacturers want to make devices that actually work, it is in their best interest to make sure their devices identify themselves correctly. A typical process for a USB drive can be seen in the images below:
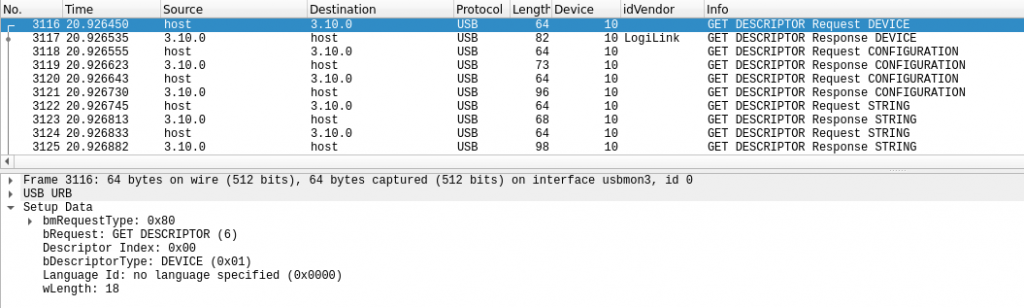
The device is plugged in, and the host makes a request for the descriptors of that device.
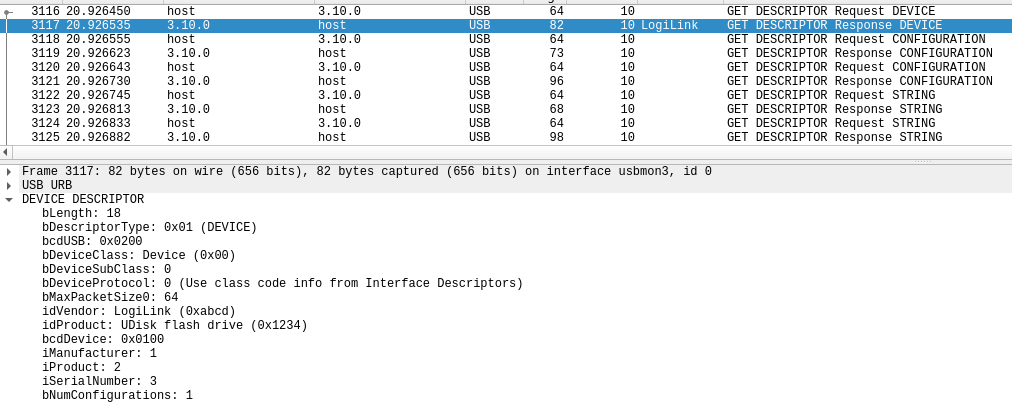
The device responds, and here we can see the idVendor and idProduct descriptors being exchanged. The host then requests the device’s configuration descriptors, which will be used to define the capabilities of the device.
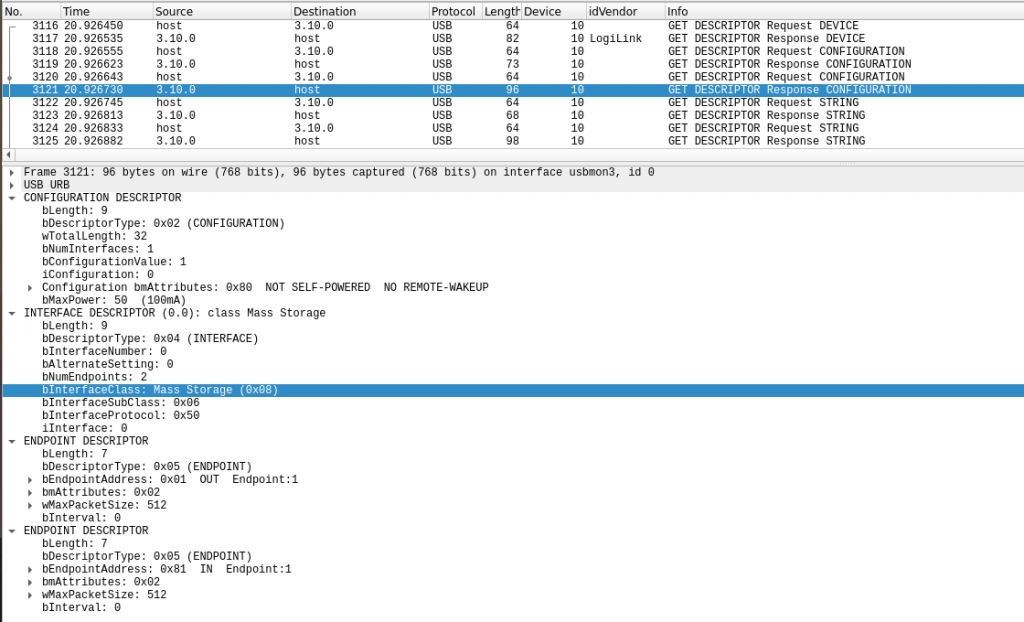
There is a lot of information exchanged to ensure that the device gets everything it needs from the host, but we are specifically interested in the highlighted line. This is a well behaved USB drive, and it identifies itself correctly using bInterfaceClass code 0x08. The host now knows that this is a mass storage device, and it can handle mounting and file transfers accordingly.
The USB Rubber Ducky takes advantage of the trust that the host has for the descriptors that are sent by the USB device. As mentioned before, the only thing that prevents a device from misrepresenting itself is the manufacturers desire to produce working devices, and in the case of the Rubber Ducky the manufacturer intentionally programmed the device to misidentify itself as an HID.
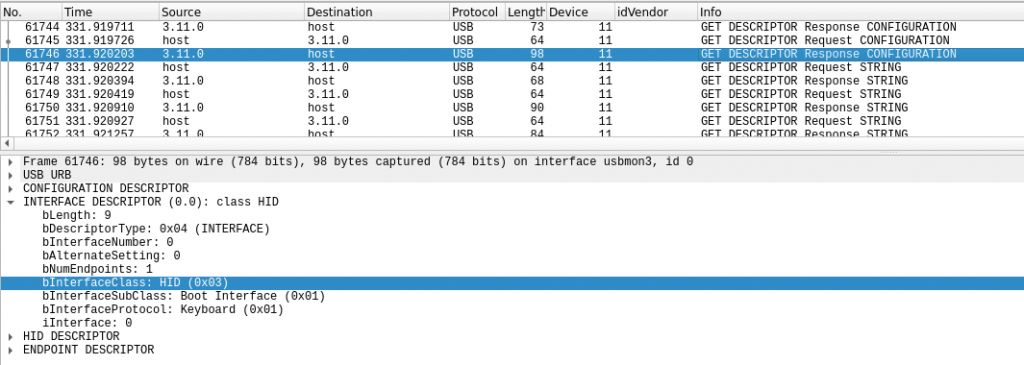
The capture shown above is from one of the ducky devices I used to do my testing. We can see that the bInterfaceClass code is set to 0x03, which will cause the host to see this as an HID. In this case a keyboard. So despite the fact that what the ducky actually contains is a micro-SD card, the host will see keyboard input and treat it as if it were any other keyboard. Now the attacker can achieve anything that would be possible while actually using a keyboard, but at much greater speeds than humanly possible. This can present an issue for organizations and individuals who are security conscious. It has long been known that locking down USB mass storage devices can improve the security of a system, but we can’t very well go around blocking keyboards. That would prevent legitimate users from doing any work and create an administrative overhead nightmare anytime someone needed a keyboard replacement.
So what can we do about that? The answer is fairly straight forward: blacklist rather than whitelist. There is a significantly smaller number of devices that can be used in these types of attacks than there are actual USB keyboards for legitimate use. If we can block just one specific device, we can prevent a large number of attacks. Luckily, the USB protocol requires the exchange of identification descriptors before anything else, so we have an opportunity to lock out the bad USBs.
Blocking USB with udev rules
On Linux systems using kernel 2.6 or later, we have a device manager called udev which will allow us to create specific rules to handle how certain USB devices are treated and configured when they are connected to the host. In many cases this will be used for tasks such as adding a label to a certain device, or perhaps mounting a drive into a specific mount point.
udev can dynamically apply the configuration specified in the rules that are created, which makes it the perfect tool for what we want to achieve. Particularly because this dynamic configuration can be done based on the idVendor and idProduct USB descriptors that were discussed earlier. This allows us to target only the devices that we want to target without impacting anything else.
I will not be going far into everything that udev can do, nor how to create new custom rules. If you are interested in learning more about that topic, I recommend starting at the Debian Wiki article about udev.
All that needs to be done is the creation of a new udev rule. This is achieved by creating a new file in the /etc/udev/rules.d directory (requires root privileges) and saving the desired configuration into that file. We only need one line to block a device:
#Amtel chip based HAK.5 USB Rubber Ducky should be disabled
SUBSYSTEM=="usb", ATTRS{idVendor}=="03eb", ATTRS{idProduct}=="2401", ATTR{authorized}="0"
A quick rundown of what this will do: if a device is connected to the “usb” subsystem with idVendor matching “03eb” and idProduct matching “2401”, the “authorized” attribute will be set to zero. Devices are given an authorized value of one by default, so by making this change we remove authorization and effectively disable the device.
In my testing and research, I found that all of the USB Rubber Duckies that I had access to actually share a common Vendor and Product ID. If you have a device that you want to block and you do not know the ID descriptors, you can find them fairly easily using the lsusb command. In this way you could expand the rule shown above to block any other devices you want to.

I created a small script to automate the process of adding the rule and restarting udev to activate it which you can download from my Github: https://github.com/YetAnotherSecurityGuy/RubberDuckyBlacklist/blob/main/ducky-blacklist.sh
Blocking USB with Group Policy
More details coming soon! I am still working on building my local domain so I can get proper screenshots for the content. In the meantime, here is the documentation that kicked off the Windows side of this project: https://docs.microsoft.com/en-us/previous-versions/windows/it-pro/windows-server-2008-R2-and-2008/cc731387(v=ws.10)